

Take a phone call
Press + New call in the top bar, or open Intake and the New phone call tab. You need "Take calls and create leads" or "Tier and route new leads".
The form asks for:
- The caller or company, the phone number and the job address (all three are required). Write the address as street, city, for example "2100 Cedar Park Dr, Alpharetta".
- The contact person, email, county, customer type and property type.
- The services asked for, the rough size in square feet (leave it blank to measure later) and the timeline: Normal, This week, ASAP or Just pricing.
- Whether there is more than one property, and your call notes.
- A box for "Caller agreed to receive texts about this request". It starts empty on every call: tick it only when the caller says yes, because texts go only to people with consent on file.
Taken by is always the person signed in. Nobody can log a call in someone else's name.
Next to the form, a call checklist reminds you what to ask: name, callback number and address; who approves the work; how many properties; what they see (cracks, potholes, fading, standing water); timeline and access; and whether it is OK to text them.
Returning callers
Once 10 digits of the phone number are typed, Asphalt OS looks the number up in your customer book. A banner says "Returning caller: ..." with Open profile (for people who may open Customers), Open lead and Add this call to .... Adding the call puts it on the customer you already have, with their address filled in, instead of making a second customer, and the text consent already on file for that number is shown under the consent box. A caller who gives no name is written under that customer as "(other number)", never as a person named after a phone number.
The customer goes with the call only while the banner says so: after Save call, the next caller starts fresh.
Several services on one call
Tick every service the caller asks about. The first one ticked is the main service, and a lead always keeps at least one. A new estimate for the lead starts with all of them.
A service your company doesn't offer (it isn't on your price list, or it is switched off) isn't lost: it goes into the lead's notes as "Asked about: ... (not on the price list)", and the app tells you.
What happens on its own
For every new lead, from a call, from your website's form (which feeds itself: a visitor fills it in and the lead is in the queue within seconds) or from any other source, Asphalt OS:
- Sends an acknowledgment email, when there is an email address.
- Sends an acknowledgment text, only when there is texting consent. A missed call gets a text-back instead.
- Gives the intake person a task, "Log, size and tier this lead", due within the new-lead time limit.
- Posts a note to the team's intake channel and the activity feed.
- Sends a PlanHub lead straight to the PlanHub estimator. If that can't happen (no address, say), it waits in the queue.
Each of these can be switched off on Automations.
The intake queue
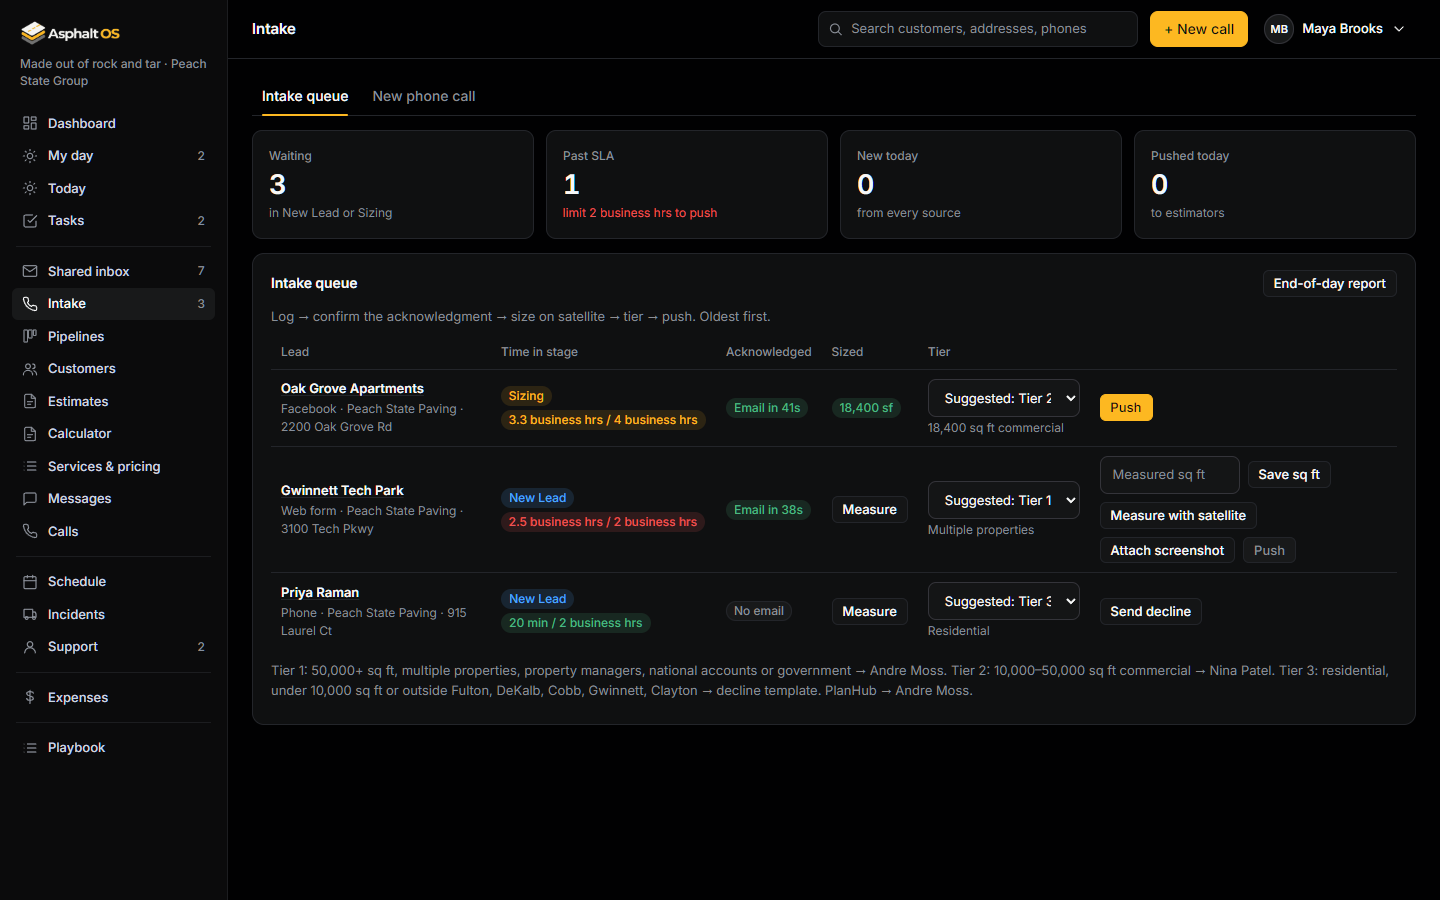
The Intake queue tab lists every lead in New lead or Sizing, oldest first. The steps are: log, confirm the acknowledgment, size, tier, push. Each row shows:
- Time in stage: the time limit clock, counting business hours only. See Time limits and reminders.
- Acknowledged: whether the email or text went out, and how fast.
- Sized: the measured square feet, or Measure, which moves a New lead to Sizing.
- Tier: Tier 1, Tier 2 or Tier 3, with a suggestion.
- The action: Push to an estimator, or Send decline for a Tier 3 lead. It stays greyed out, with what is missing, until the lead is ready. Whoever measures properties ("Measure properties on satellite") fills in what is missing right there: the measured square feet (Save sq ft), the measurement screenshot (Attach screenshot), or Measure with satellite, which runs a takeoff on the property address and saves the size on the lead. The lead's page has all three too.
The real TruTec connection isn't built yet. Without a TruTec key the satellite numbers are simulated, and the screen says so; with a key saved on Connections, the button says the connection isn't built instead of measuring. Type the size yourself when it matters.
How the tier is suggested
The first rule that fits wins:
- A PlanHub lead is PlanHub.
- A county outside your service area is Tier 3 (out of area).
- A homeowner or a residential driveway is Tier 3.
- More than one property, a property manager, a national account, a government or a municipal customer is Tier 1.
- Otherwise the size decides: 50,000 sq ft and up is Tier 1, 10,000 sq ft and up is Tier 2, anything smaller is Tier 3. You set both sizes on Automations.
If your list of service counties is empty, every lead that has a county counts as out of area. Fill in your counties during setup or on Automations.
Push and decline
- Push needs an address, the measured square feet, a tier and a measurement screenshot (a PlanHub lead only needs the address). It hands the lead to the Tier 1, Tier 2 or PlanHub estimator you chose on Automations, gives them a "Build the estimate" task, and alerts your escalation person about Tier 1 leads.
- Send decline closes the lead as Lost ("Out of service area" or "Out of scope") and sends the decline message by email, or by text when there is consent. With neither, the app tells you to call them.
Pushing, declining and tiering need "Tier and route new leads".
The end-of-day report
End-of-day report on the queue shows today's numbers: leads logged, acknowledged in under a minute, sized with a screenshot, tiered, pushed, declined, the average time to push, what is still in the queue and the emails left in the inbox. Save today's report keeps it; saving again the same day updates it. Saved reports are also on Reports.
The Calls page
Calls lists phone calls, newest first: when, which way (called us or we called), the customer, who took it, the length, and whether there is a recording and a transcript. Search by name or phone number.
- Open a call to play the recording, or upload one (MP3, M4A, WAV or OGG, up to 50 MB).
- Type or paste what was said into the transcript and press Save transcript. Transcribe from the recording works once a transcription service is connected. See Connections.
"See phone calls, recordings and transcripts" lets people listen and read. "Upload call recordings and edit transcripts" lets them change them. A call on a lead is visible only to people who can see that lead, and whoever logged a call can always see it.
Deleting a call
Deleting is for higher-ups: "Delete phone calls and their recordings" (the CEO, VP Operations, VP Sales and the Office manager to start with). Delete call at the bottom of the call removes it with its recording and its transcript; the history log keeps one line, the number and the date, never what was said.
Everyone else presses Request deletion, says why in a sentence, and the office person the routing names (or the highest-ranked person who can delete) gets a task with an Open the call link. The call shows Deletion requested until someone acts: deleting it finishes the task; ticking the task off keeps the call and ends the request.